Introduction
A Slip Ring Connection allows the transmission of power and/or electrical signals from a stationary structure to a rotating structure.
Parts
- Maker Tape
- Jumbo 10mm Diffused LED × 2
- CR2032 Battery
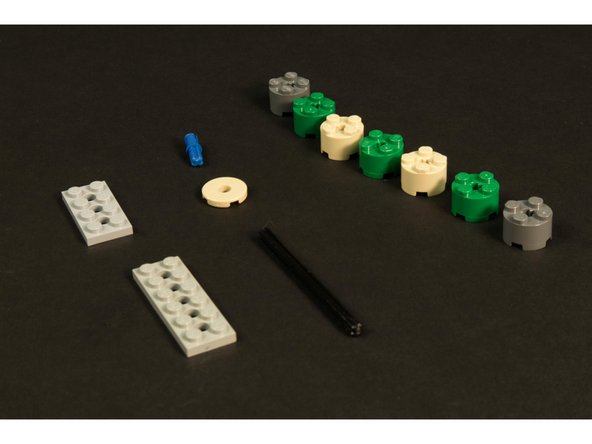
- LEGO Brick 2 x 2 Round (3941 / 6143) × 7
- LEGO Tile 2 x 2 Round with Hole in Center (15535)
- LEGO Axle 8 (3707)
- LEGO Axle to Pin Connector with Friction (43093)
- LEGO Technic Plate 2 x 6 with Holes (32001)
- LEGO Technic Plate 2 x 4 with Holes (3709)
- LEGO Baseplate
- Misc LEGO Parts
Video Overview
Featured Document
-
-
A slip ring connection allows the transmission of power and/or electrical signals from a stationary structure to a rotating structure.
-
We can easily build one using some round LEGO pieces and conductive Maker Tape.
-
We'll show the basic LEGO construction we used in a simple project, but this should be considered a basis for any build that you want to incorporate a slip ring connector into.
-
The attached PDF shows the basic technique we'll use for construction. We recommend you view it along with this guide.
-
-
-
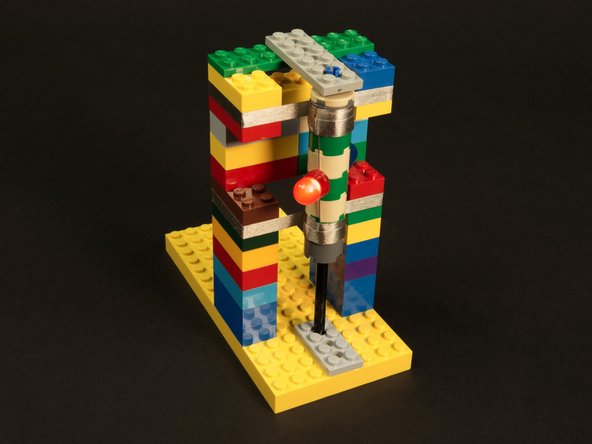
Our slip ring connector will consist of a CR2032 battery with Maker Tape connections for positive and negative strips of tape.
-
We'll also have a cylinder with an LED attached to it with Maker Tape. The tape holds the LED legs in place and wraps around the cylinder to create the connection points.
-
When the cylinder is in contact with the positive and negative strips the LED will light up. Even when the cylinder is rotating, the circuit is still connected.
-
-
-
As with all LEGO projects a variety of parts can be used. We’ve listed all the parts we chose but you should use what works, or what you already have on hand when possible.
-
Besides the specified LEGO parts you’ll need a LEGO baseplate, and a bunch of standard LEGO bricks.
-
At the end of this guide we'll also list some other LEGO parts if you want to alter this project to include a hand-crank or a motor to turn things.
-
-
-
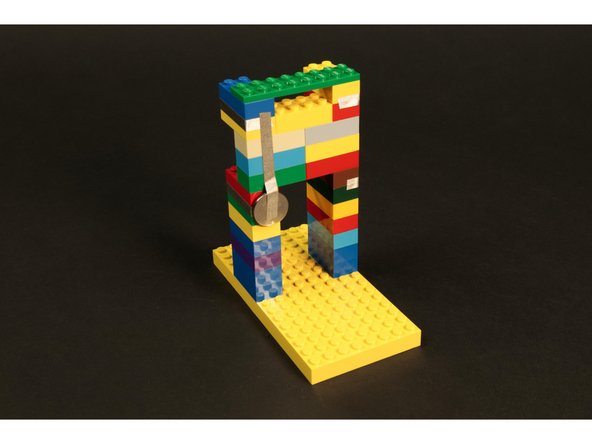
Using standard LEGO bricks build a frame on a LEGO baseplate.
-
Wait, how large should the frame be? This will depend on the rest of the build. We always recommend you read through the entire guide first before you start building.
-
You'll need one LEGO plate to span the top of your frame.
-
As with all LEGO builds, there are multiple ways to do things, so feel free to make your own choices when building.
-
-
-
We're going to wrap two separate strips of Maker Tape around the frame, crossing the gaps on the front.
-
You'll want to make the tape taut across the gap. (But don't pull it so tight you break your frame apart!)
-
The tape should just wrap around to the back. You'll want enough of the tape stuck down so it doesn't easily come loose.
-
-
-
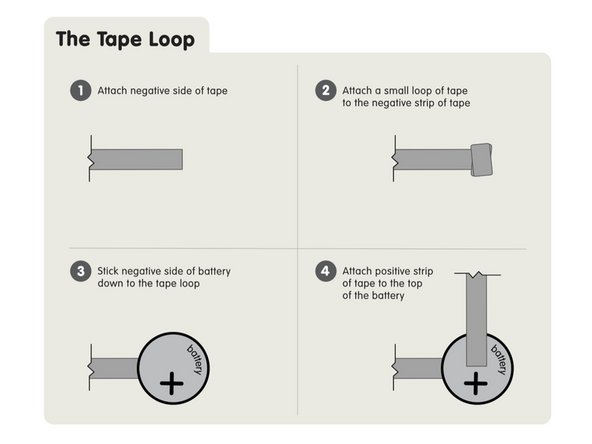
We're going to hold our CR2032 battery in place with a tape loop.
-
Remember, Maker Tape is conductive on both sides and all the way through!)
-
Stick the battery negative side down to the tape loop, then run a strip on top of the battery (on the positive side) and up so it connects to the top strip of tape.
-
We've now got a positive side of our circuit (the upper tape strip) and a negative side of the circuit (the lower tape strip).
-
Our circuit is ready to power some LEDs!
-
-
-
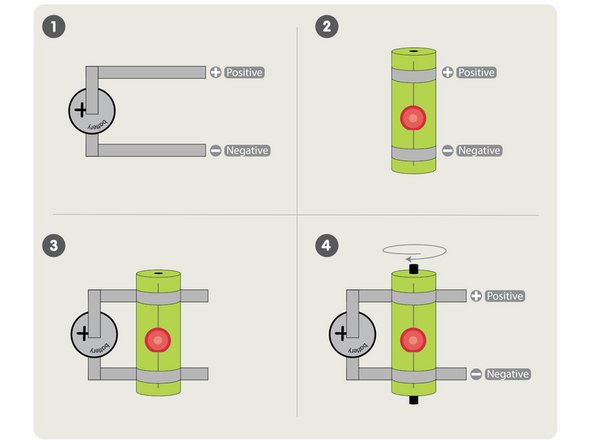
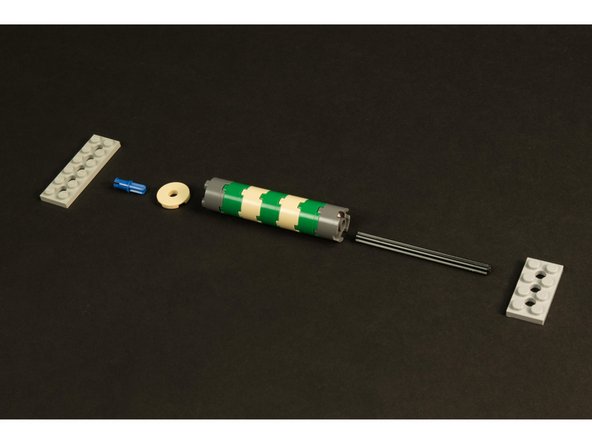
Build a cylinder using the parts shown.
-
The two plates with holes will hold the axle of the cylinder in place at the top and bottom.
-
The round smooth plate with a hole will go at the top of the cylinder with the pin, and the axle will go at the bottom of the cylinder.
-
-
-
When your cylinder is complete, attach it to the frame to make sure everything fits.
-
It should be positioned so it is touching the upper and lower strips of Maker Tape and so that it can rotate freely.
-
Adjust how far the bottom axle is pushed into the round LEGO pieces of the cylinder so that it is the correct height.
-
-
-
Remove the cylinder from the frame and prepare your LEDs. We decided to add two LEDs, but you can use just one if you prefer.
-
Spread the LED legs out flat, making note of which leg is positive (it's the longer leg) and which is negative (the shorter leg).
-
Use strips of Maker Tape to secure the LED legs to the cylinder. We want the positive leg at the top of the cylinder so it matches the polarity of the strips of tape we applied earlier.
-
Don't be afraid to wrap the Maker Tape around the cylinder a few times. This will actually help make a stronger electrical connection.
-
-
-
Put the cylinder back in place on the frame and when the tape on the cylinder makes contact with the tape on the frame the LEDs should light up!
-
Now rotate the cylinder... The LEDs should stay lit, even as the cylinder rotates.
-
If your LEDs don't seem to stay lit, you can try to tighten the tape on the frame so it is taut between the gap, or you can wind a bit more tape around the cylinder.
-
You may notice the red LED is much brighter than the blue LED. This is normal. The blue LED requires more voltage than the red LED, so when both are connected to the same power source the red one will steal more of the available voltage.
-
Note: The LEDs we use have built-in resistors to limit the current, but you'll still see differences in how bright different colors are in the same circuit, especially when using multiple LEDs with a single CR2032 battery.
-
-
-
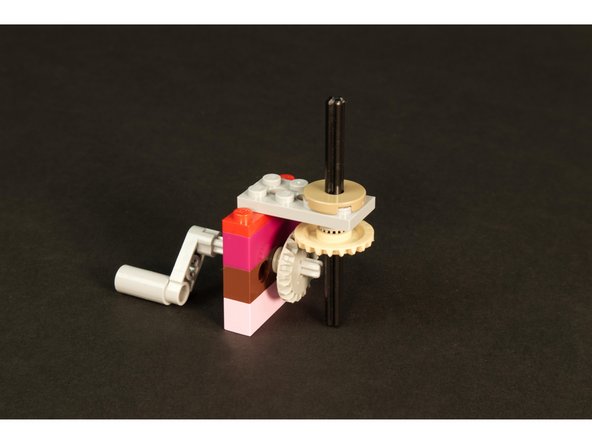
We also built a hand crank that we can use to turn our cylinder!
-
Below is a list of parts we used, but you should feel free to create your own right angle gear and crank mechanism with whatever parts you want.
-
2 x LEGO Gear with 20 Teeth and Bevel, 1 x LEGO Technic Half Beam 3 with Knob and Pin, 1 x LEGO Pin Joiner Round with Slot, 1 x LEGO Axle 5, 3 x LEGO Technic Bush 1/2 with Teeth Type 1, 1 x LEGO Technic Plate 2 x 4 with Holes, 1 x LEGO Plate 1 x 4, 2 x LEGO Brick 1 x 4, 1 x LEGO Technic Brick 1 x 4 with Holes
-
You should be able to add the hand crank mechanism to your frame. Adjust the axle on the cylinder as needed to set it at the correct height.
-
-
-
You can also motorize you cylinder so you don't need to turn it by hand!
-
We used a LEGO Compatible Motor connected to a 2 AAA battery pack to get our cylinder spinning.
-
If you want to control your motor using code, you can add a LEGO Compatible Continuous Rotation 360 Degree Servo and then use a Bit Board (with micro:bit) or a Robotics Board to control the servo.
-
You can also use a LEGO Compatible 270 Degree Servo, though you won't be able to rotate the cylinder 360 degrees, though you could turn the cylinder back and forth, just like an oscillating fan!
-


Making a slip ring connection is a great use of Maker Tape, since it's strong, flexible, and conductive on both sides, and this basic introduction can serve as a starting point for more advanced circuits.
Making a slip ring connection is a great use of Maker Tape, since it's strong, flexible, and conductive on both sides, and this basic introduction can serve as a starting point for more advanced circuits.
Attached Documents
