
Introduction
Use one micro:bit to control another! We'll build a simple remote control we can use to drive around a LEGO car.
Video Overview
Featured Document
-
-
You're probably familiar with remote controls. Usually you press a button and something happens! :)
-
You may have used a remote control to open a garage door or to change the channel on a TV.
-
Some remote controls use infrared light (like the TV remote) and some use radio signals (like the garage door remote.)
-
Our Remote Control system will use the Bluetooth radios built into the micro:bit so one can send signals to another one.
-
Our first micro:bit will be a transmitter (which sends signals) and our second micro:bit will be a receiver (which receives the signals).
-
-
-
Our transmitter will use a thumbstick as its control mechanism.
-
Use 4 Female/Female Jumper Wires to connect the thumbstick to the header pins on the rear of the Bit Board.
-
Plug the Thumbstick VRY into Pin 1, VRX into Pin 0, +5V into the + (positive) column, and GND into the - (negative) column.
-
-
-
Connect a USB cable to the micro:bit and then plug it into your computer.
-
We'll be using makecode.microbit.org to program our board. It uses a simple drag and drop block interface.
-
We're going to load the following code for our RC Transmitter Thumbstick program: https://makecode.microbit.org/_fJgYq7YfV...
-
-
-
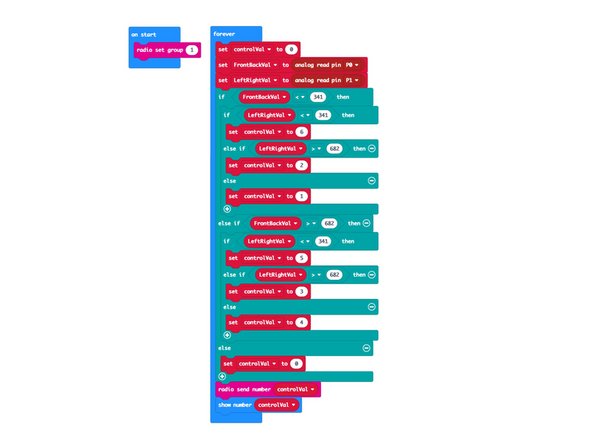
The code for our transmitter checks to see if the thumbstick is pressed in a certain direction, and if so, sends a number to the receiver telling it what to do.
-
The code will also display the corresponding number on the built-in LED matrix on the front of the micro:bit
-
Try it out! If you've loaded the code and your providing power via the USB cable or the battery pack you should be able to move the thumbstick and see a number appear on the LED matrix.
-
The number shown on the front of the micro:bit is not needed for the transmitter to operate properly. It's just an informational display we can use to test it out.
-
-
-
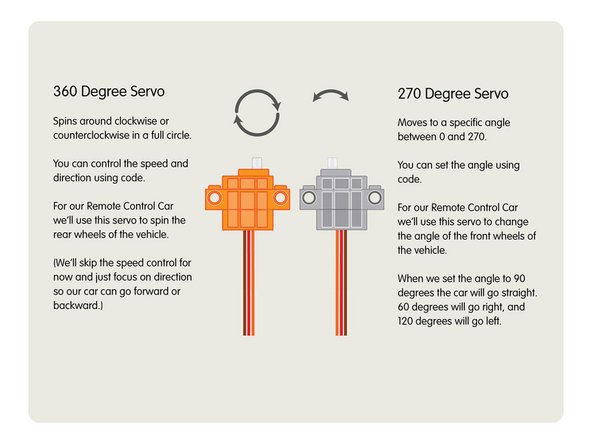
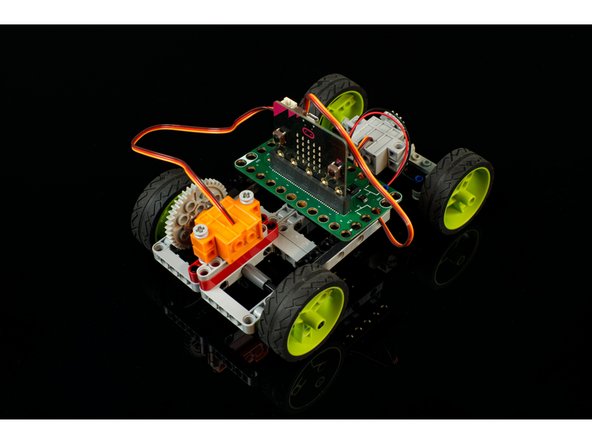
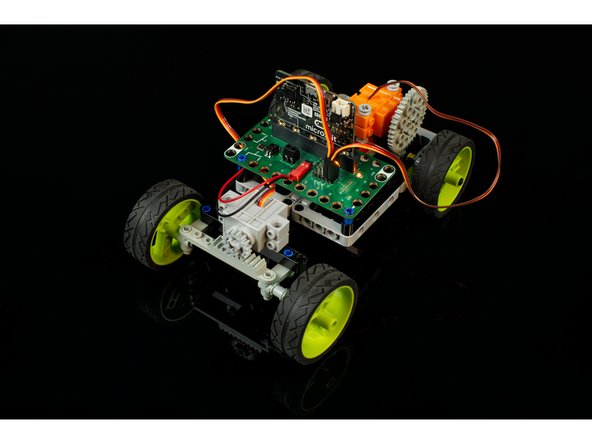
For our receiver we'll be connecting two servos. The first is orange servo, which is a 360 degree rotation servo and basically acts like a simple motor that we can control the speed and direction.
-
The second servo is gray, and can move to a specific angle that you set in your code. (It will not spin around 360 degrees like the orange one. It will move about 270 degrees.)
-
The orange 360 degree servo goes into Pin 13 and the gray 270 degree servo goes into Pin 14.
-
Make sure you plug in the servo connectors with the orange wires next to the numbered pins. The red wire will then be in the + (positive) column and the brown wire will be in the - (negative) column.
-
We've got a full guide on using the LEGO Compatible 270 Degree Servo if you want to go in-depth!
-
-
-
Connect a USB cable to the micro:bit and then plug it into your computer.
-
We're going to load the following code for our RC Receiver Thumbstick program: https://makecode.microbit.org/_Ewb6ThJ1v...
-
-
-
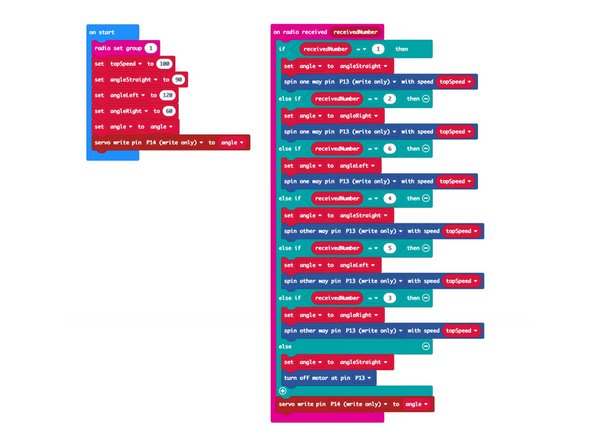
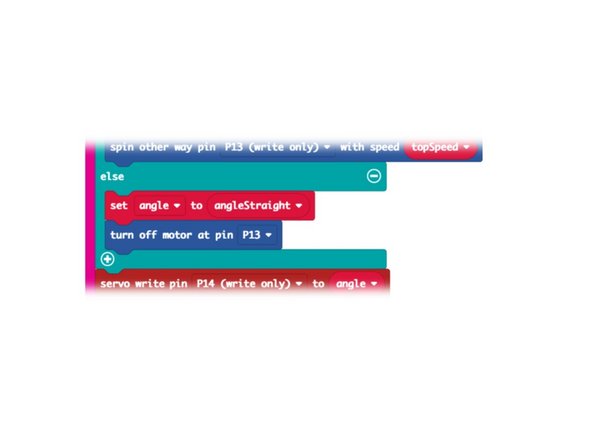
When our receiver gets a number from the transmitter it will send commands to control the two servos.
-
The orange servo will either spin clockwise or counterclockwise, which will cause the car to go forward or backward.
-
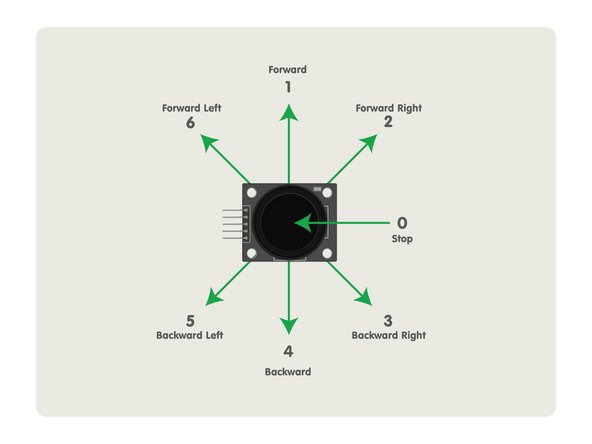
The gray servo will move to a specific angle. 90 degrees for straight, 60 degrees for right, and 120 degrees for left.
-
We've got one little trick in our code for the receiver. It will check for 1, 2, 3, 4, 5 or 6 from the transmitter, but if it doesn't get any of those it assumes it got a 0 (zero) and the final else statement will set the steering angle to straight and turn off the drive motor.
-
-
-
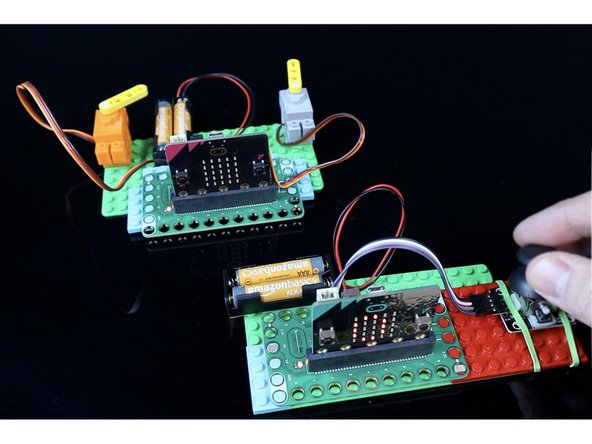
Power up your transmitter and receiver, each with their own 2 AAA Battery Packs and test it out!
-
You should be able to move the thumbstick to the six positions, and see the number display on the LED matrix on the front of the transmitter's micro:bit
-
You should also see the two servo motors respond when you are using the transmitter. (Remember, the orange servo is our "drive" motor, and the gray servo is our "steering" motor.
-
-
-
We know what you're thinking... Take it Further? We didn't even build car! Hey, building a car is a complex project!
-
At this point we've covered the Remote Control system that can control a LEGO car... so next we will build a car!
-
In the meantime, think about how this system could be used for other things. Maybe you want a Remote Control Winch or maybe a Remote Control Surprise Ghost.
-
The basic concept of a Remote Control system should now make sense, so we will take this further in subsequent guides... including one focused on building a car. :)
-


Cancel: I did not complete this guide.
One other person completed this guide.
Attached Documents
